
Overview - Kony Fabric Single Container Solution
The Kony Fabric Single Container On-Premises solution offers a quick way to set up Kony Fabric on your local environment. It leverages the following technology:
- Docker - To package different components as portable container images (with all the required binaries and libs)
Salient Features
The Kony Fabric Single Container Solution provides developers with tools to build applications.
The Kony Fabric Single Container Solution has the following features:
- Deploys Kony Fabric on a native Docker container.
- Supports multi-platform deployment in Windows, Linux, and Mac.
Prerequisites
- On Windows machines, use any bash/shell prompt for executing the install-fabric.sh script. Mac and Linux support Bash prompt by default.
- Install Java 11.
- Install an external Database. (The supported types are mentioned here.)
For Windows 8.1 and Windows 10 Pro machines, disable Hyper-V if it is already enabled before installing VirtualBox.
- Kony supports only VirtualBox version 5.2.8 and later.
- Intel VT and related settings should be enabled in system BIOS.
NOTE: To execute the installation scripts, you must use Bash version 4 or later.
Software Requirements
Supported Application Servers
Kony Fabric Single Container Solution supports only the Tomcat Application server.
All the Docker images built for Kony Fabric are built using the Tomcat version 8.5.35-jre11 as the base image.
Supported Databases
Kony Fabric Single Container Solution supports the following database servers:
| Database Type | Version Supported |
|---|---|
| MySQL | 5.6, 5.7 |
| Microsoft SQL Server | 2016, 2017 |
NOTE: You must have an existing external database. Databases do not come bundled with the Installer.
Hardware Requirements
- CPU: Dual-core processor
- Memory: A minimum RAM of 8 GB is required. Kony recommends using a system with 16 GB RAM.
Architecture
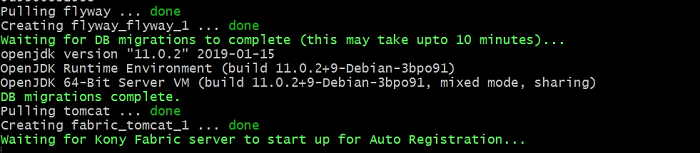
For flyway migrations, a container with database image (kony-fabric-db) is created. The database image is terminated after all the migrations are completed.
After the migrations are completed, the second container will run the Kony Fabric Docker single image(kony-fabric-all). This container keeps running in the background for as long as the Kony Fabric setup is required.
Following are the two containers present in the Kony Fabric Single Container Solution:
- Kony Fabric
- Database (exists on completion of the Database scripts execution)
The following is the list of Docker images used in the Kony Fabric Single Container Solution:
- Fabric (Contains
mfconsole.war,workspace.war,accounts.war,apiportal.war,authService.war,admin.war,services.war,middleware.war,apps.war, andkpns.war) - Database (Contains database migration scripts)
Images are pushed into the Kony Fabric Docker Hub registry:
https://hub.docker.com/u/konyfabric
Kony Fabric Single Container Solution downloadable bundle contains the following directories and files.
- install-fabric.sh - Installation script
- install-actions.sh - Installation actions script
- templates - Directory containing the config template files
- config.properties - Properties file to pass the inputs to install-fabric.sh instead of giving inputs in shell prompts.
- lib - Folder containing the fabric-utils.jar file.
- fabric- Folder containing the docker-compose.yml file.
- flyway- Folder containing the docker-compose.yml file.
Installation Types
- Command Line or GUI Installation - Kony Fabric Single Container Solution can be installed using the bundled install shell script, which will prompt the user for the required values.
- Silent Installation - The installation script also supports silent installation if the config.properties file is passed as an argument (for example, /path/install-fabric.sh config.properties). Using this, you can have additional ability to pass custom Tomcat JAVA_OPTS, and time-zone settings as well.
Configuration
The following parameters are to be provided by the user during Installation:
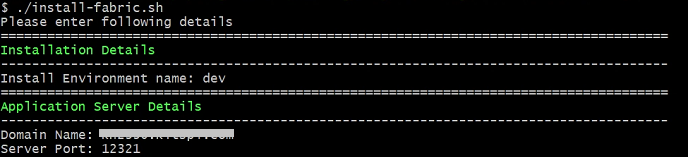
- Install Environment Name - The install environment name can be anything, for example,
dev,qa,prod, oreastusprod. - Domain Name - The Domain Name for Kony Fabric.
- Server Port - The Port Number for Kony Fabric.
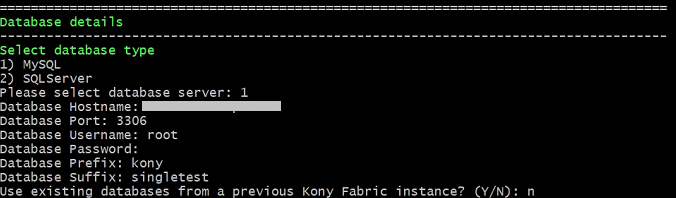
- Database Details:
- Database Type - This is the Database Type you want to use for hosting Kony Fabric.
- Database Hostname - This is the Database Server hostname used to connect to the Database Server.
- Database Port Number– This is the Port Number used to connect to the Database Server.
- Database Username - This is the preferred Database Username used to connect to the Database Server.
- Database Password - This is the Database Password used to connect to the Database Server.
- Database Prefix – This is the Database server prefix for Kony Fabric Schemas/Databases.
- Database Suffix – This is the Database server suffix for Kony Fabric Schemas/Databases.
IMPORTANT: The Password must be a string containing at least 8 characters, and must include at least one uppercase letter, one lowercase letter, one digit and one special character.
NOTE: In case of upgrade, ensure that the values of the Database Prefix and Suffix that you provide are the same as you had provided during the initial installation.
- Automatic Registration Details (not applicable for upgrade):
- User Id – E-mail ID used for Kony Fabric Registration.
- Password – Password used for Kony Fabric Registration.
- First Name – First Name used for Kony Fabric Registration.
- Last Name – Last Name used for Kony Fabric Registration.
- Environment Name – The Kony Fabric Environment to publish generated applications.
- Time Zone - The Time Zone of the Database used for Kony Fabric installation.
NOTE: The Time Zone is an optional value. If you do not provide any Time Zone, it is set to Etc/UTC.
NOTE: The Install Environment Name must not contain numbers.
NOTE: Domain name cannot be a dynamic IP address or 'localhost'. Although, the domain name can be a static IP address.
NOTE: Ensure that the entered port is not being used by another service.
Installation
Run the Kony Fabric Single Container install script to generate and deploy Kony Fabric containers.
Steps to Install Kony Fabric Single Container Solution on On-Premises:
- Download the kony-fabric-containers-onprem_8.4.1.1_GA.zip from https://community.kony.com/download and extract it. The file structure will be as shown below:
config.properties install-fabric.sh* install-actions.sh* lib/ templates/ fabric/ flyway/
- Run the
install-fabric.shfile. - Enter the Install Environment Name and Domain Name.
- For the Database details:
- In case of new Install, provide the following details.
- In case you are upgrading using an existing database, you must additionally provide the Previous install artifact directory which is the location of your existing Kony Fabric instance.
- Ensure that the database details you provide point to an existing database instance.
- In case of upgrade, ensure that the database points to the existing instance of the database running Kony Fabric.
- Database Hostname cannot be localhost.
- If the Database Prefix or Suffix contain numeric characters, enclose the values in single quotes (' ').
- In case of upgrade, ensure that the values of the Database Prefix and Suffix that you provide are the same as you had provided during the initial installation.
- Enter the Administration Account Configuration details as shown:
NOTE: This step is not applicable for upgrades. You can use the credentials that you used to create the initial account.

NOTE: The Password must contain at least 8 characters, at most 20 characters and must include at least one uppercase letter, one lowercase letter, one digit and one special character.
- Enter the Time Zone of your Database as shown:

NOTE: The Time Zone is an optional value. If you do not provide any Time Zone, it is set to Etc/UTC.
NOTE: You must provide execute permissions to run the install-fabric.sh and install-actions.sh files on Linux and Mac.
NOTE: Domain name cannot be a dynamic IP address or 'localhost'. Although, the domain name can be a static IP address.
Once all the input parameters are given, the installation procedure starts.
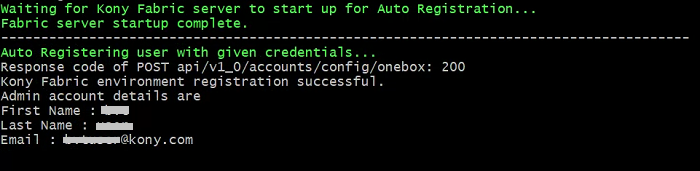
NOTE: Auto Registration will not occur during upgrade.
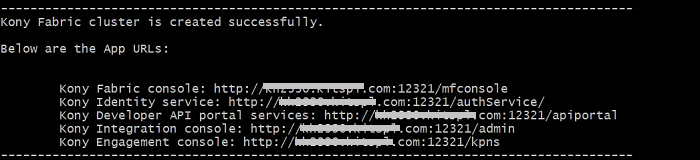
After successful completion of execution, the Kony Fabric URLs are displayed on the screen.
Limitations
Kony Fabric Single Container Solution has the following limitations:
- Support for SPA / Desktop Web is only available for zipped SPA apps, but not for WARs.
- Log Analytics is currently not supported.
FAQs and Troubleshooting
- Do I need to have an account with the Docker Hub to pull the Kony Fabric Images?
No. The images are public, and you do not need any authorization to download them.
Extracting Logs from your Application
To perform any actions related to the logs of your application, you need the names of the containers in the application.
The Container names are:
- Container name for Fabric:
fabric_tomcat_1 - Container name for Flyway:
flyway_flyway_1
If you want to extract logs from a container, execute the following command from your terminal:
docker logs -f <container_name>
If you want to teletype (tty) into the container, execute the following command from your terminal:
- For Windows:
winpty docker exec -it <container_name> bash - For Mac/Linux:
docker exec -it <container_name> bash
NOTE: A database container terminated after the flyway migrations are complete. As a result, you cannot tty into the database container post installation.
If you want to copy logs (for example: Component logs) from the Fabric container to your local machine, execute the following command from your terminal:
docker cp <container_name>:<location_in_container> <location_in_machine>
For example: To copy authService logs, execute the following command from your terminal:
docker cp fabric_tomcat_1:/usr/local/logs/authService.log /d/Fabric/logs
NOTE: Component logs can be found at /usr/local/logs inside the container.
Configuring Visualizer to connect to Kony Fabric
For details on configuring Visualizer to connect to Kony Fabric, refer to Connect to Kony Fabric in the Visualizer User Guide.